

Startup, testing and troubleshooting
introduction
Make sure you've installed all of the required programs & drivers before going ahead with the startup
If your question doesn't figure in our list of FAQ's please send an email to our customer support at info@ulio3d.com
Begin the startup
Estimated time: 8 hours
A
POWER UP
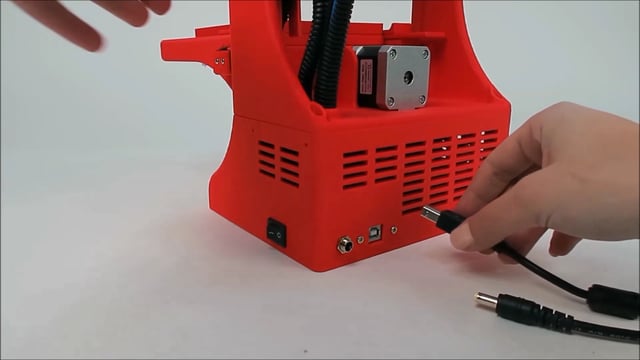
1 . Plug the power supply into the 120 VAC wall outlet
- You should see a green light on the power supply
2 . Plug the power supply into the DC power jack of the printer and turn ON the switch (straight line = ON, O = OFF)
3 . Look through the vents of the enclosure, you should see a green power indicator LED turn on
+ I don't see a green LED light
- Make sure the power supply is properly connected
- Make sure the power terminal wiring is well connected (section 4)
- It's highly unlikely but maybe a fuse is blown?
- If a red LED stays lit when the board is powered
- Check that the power source is not plugged into the Heater outputs
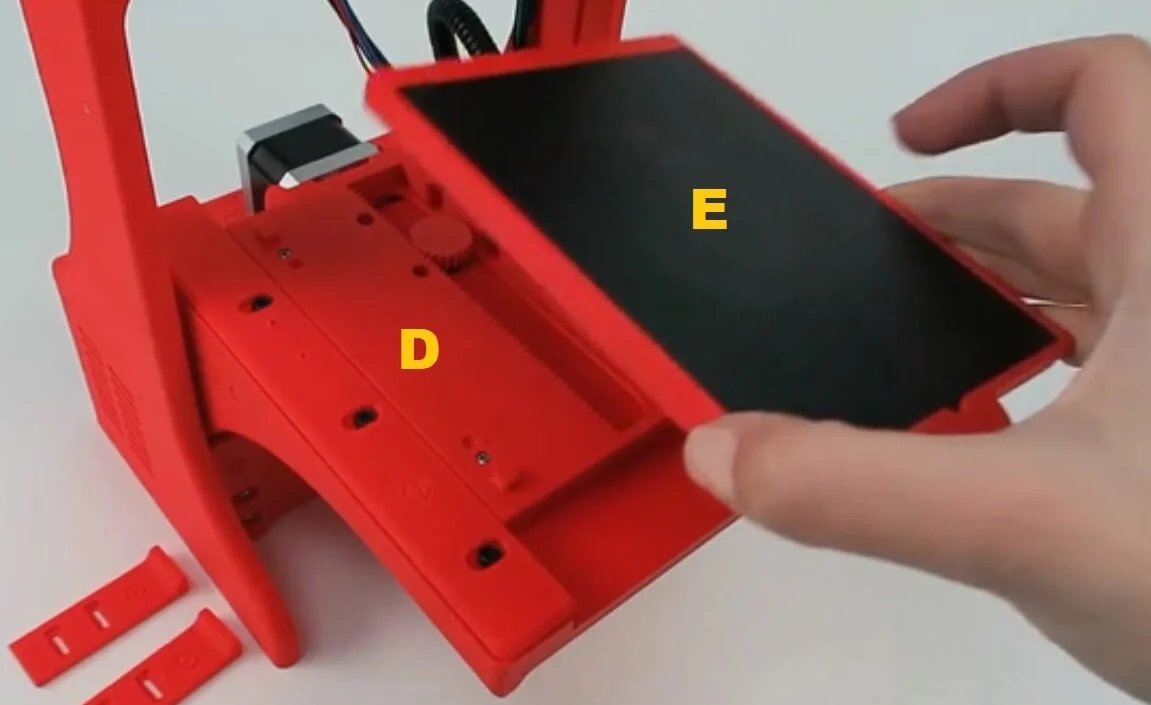
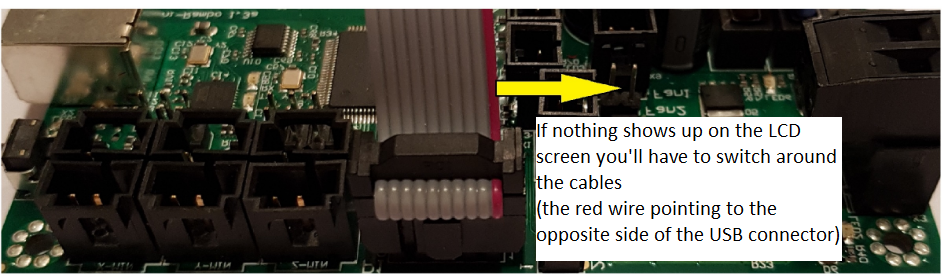
+The LCD display is not lighting up
- You might have to switch around your cables
- Make sure you adjusted the contrast at the back of the display controller
B
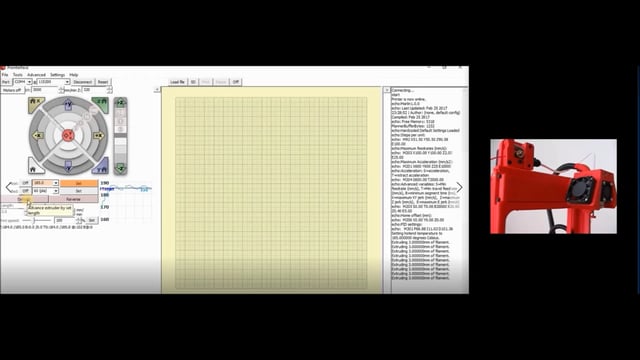
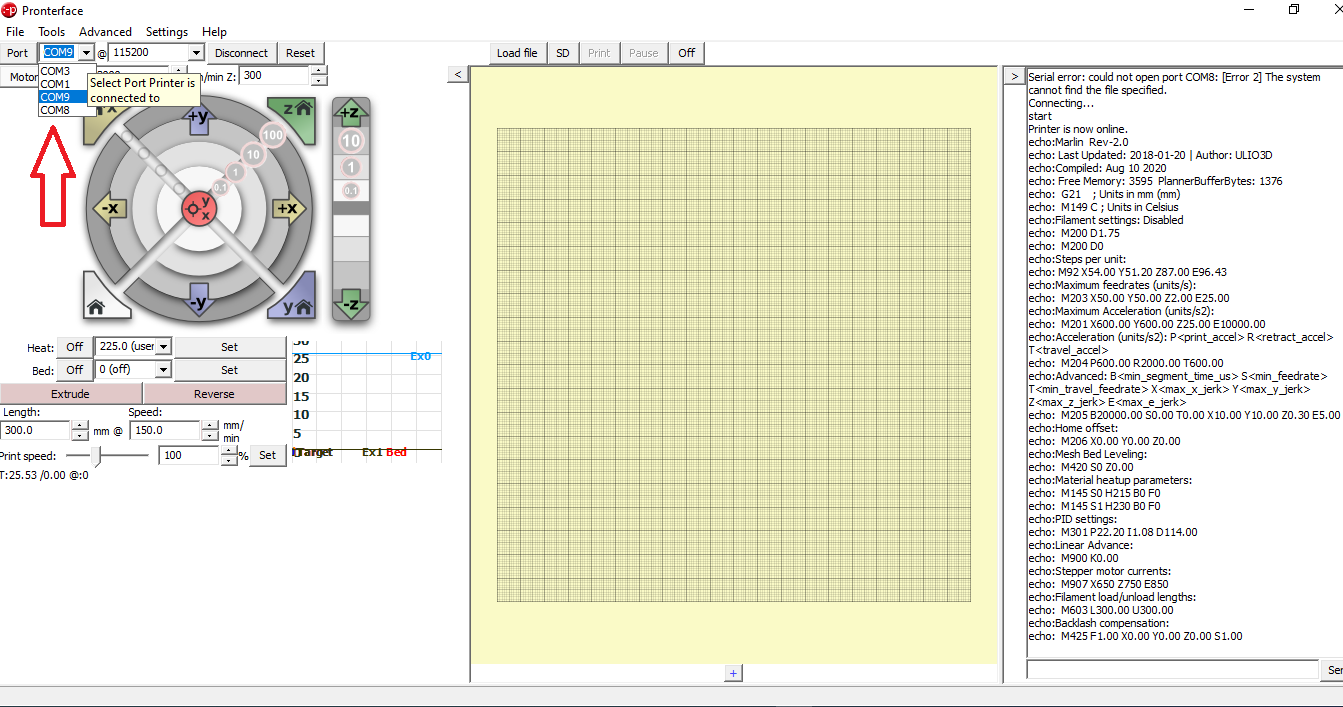
PRONTERFACE connection
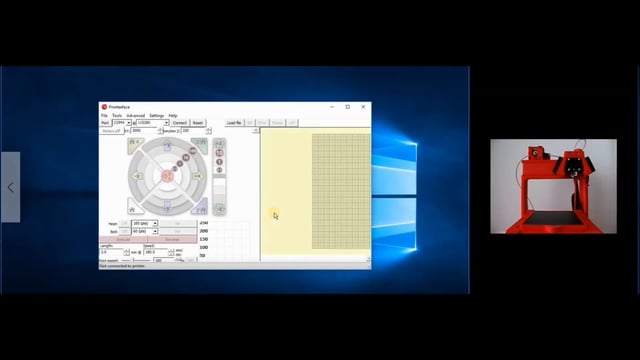
1 . Make sure you have:
- Installed the mini Rambo driver
- Uploaded the Marlin firmware into the microcontroller
- Installed Pronterface before continuing to the following steps
2 . Begin the startup (watch the video on the left)
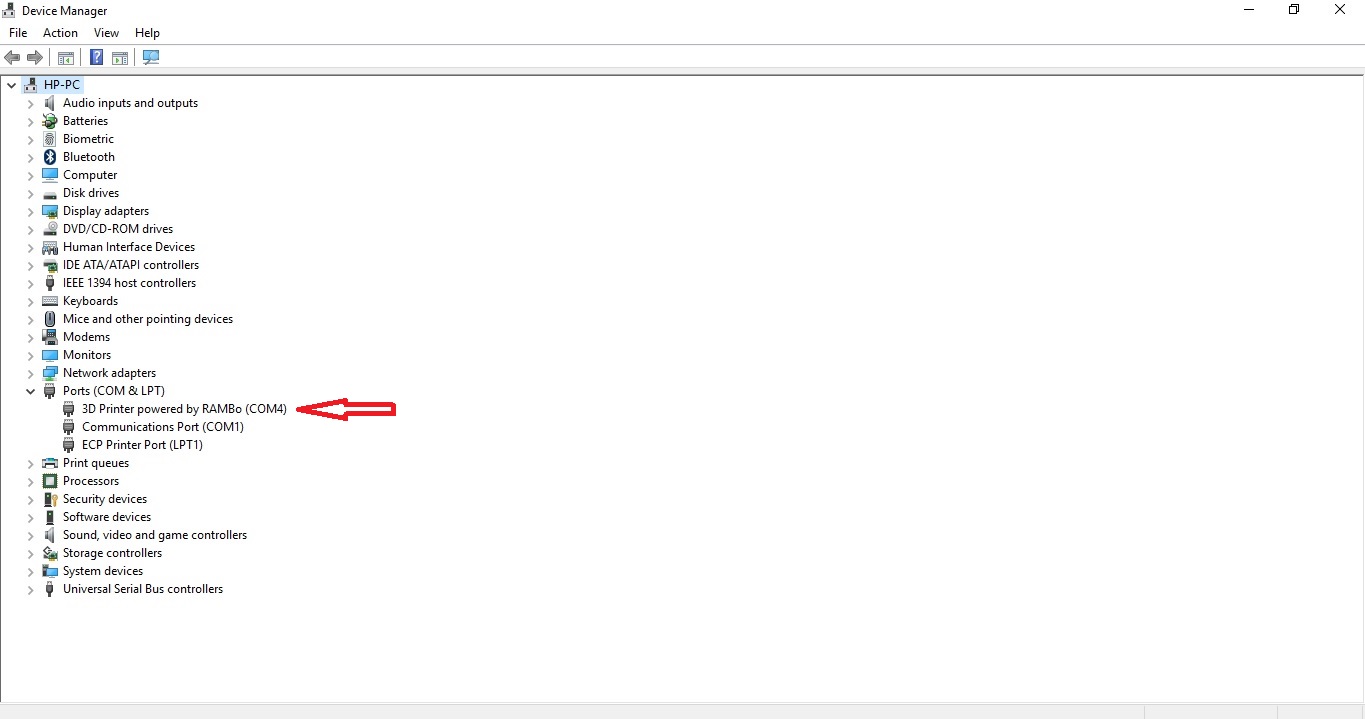
+ I don't see the Rambo USB connection
- Make sure the printer is powered ON (step A)
- Uninstall the Rambo driver from the device manager and reinstall it again
- Try connecting with another PC
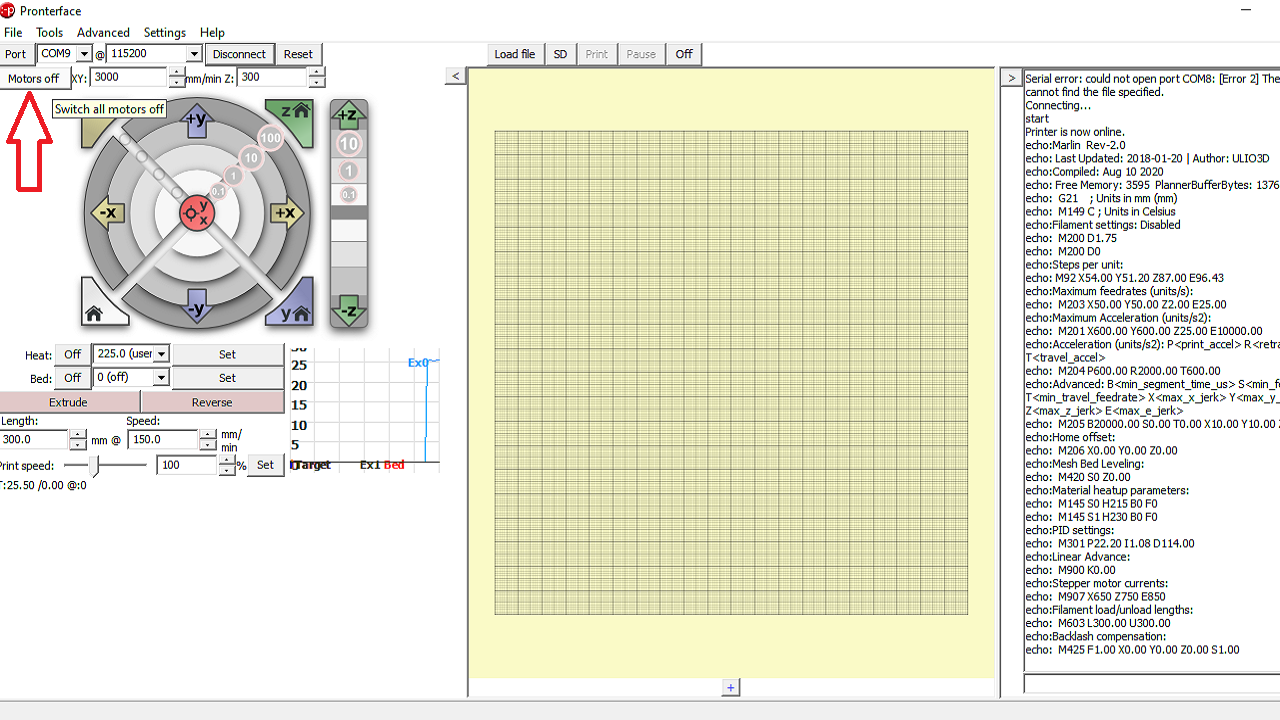
+ I can't connect to Pronterface
- Make sure the printer is powered ON (step A)
- Make sure to select the correct USB port address
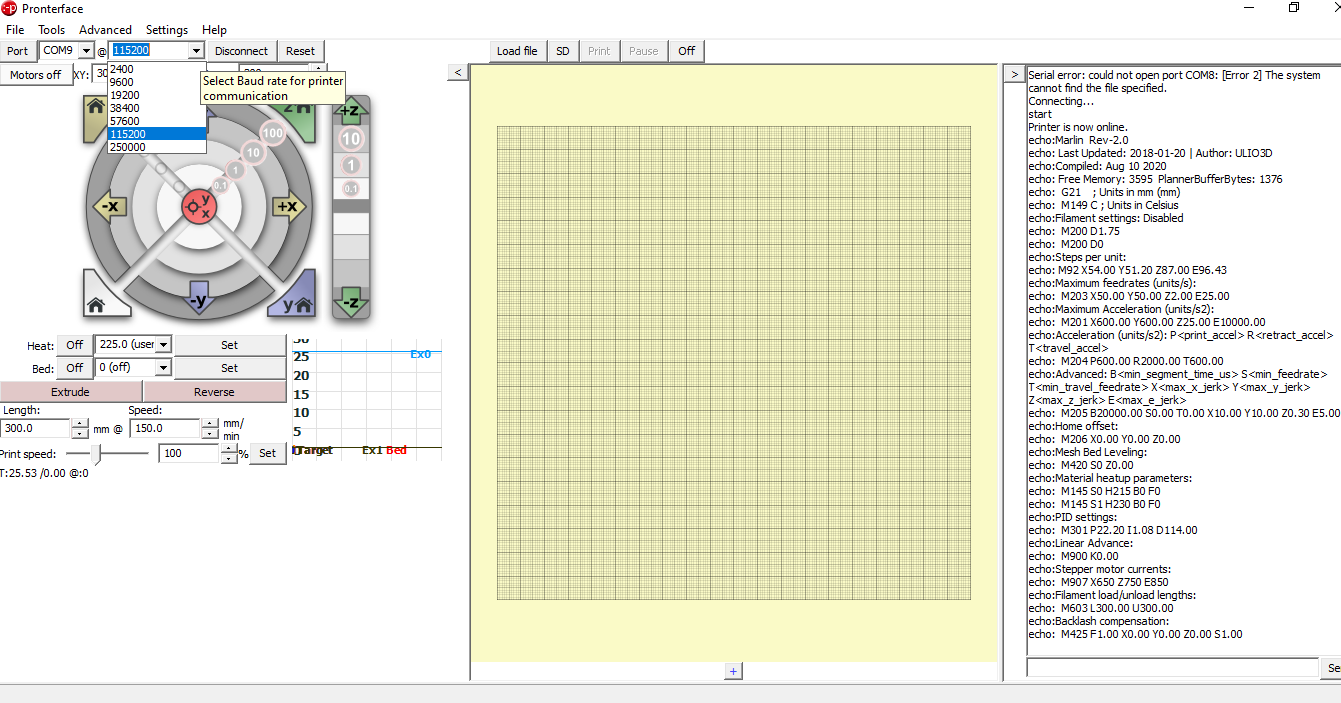
- Make sure the Baud rate is set at 115 200
- Make sure the printer is not connected to another software (ex CURA or other)
- Disconnect from any other software then try reconnecting to pronterface
- Try connecting with another PC
C
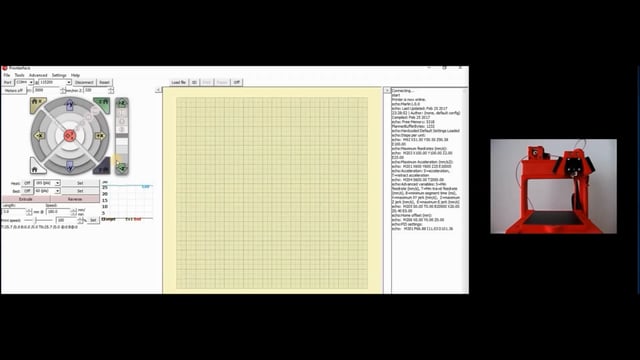
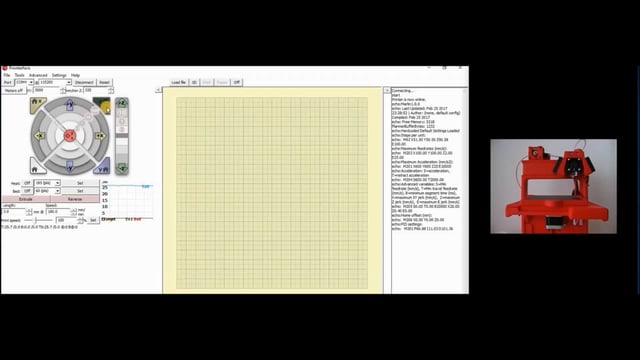
X AXIS MOVEMENT

1 . Make sure you added lubrication (section 4)
2 . Begin the startup (watch the video on the left)
+ The X axis rack is not moving at all
- Make sure the X motor connector is plugged properly onto the right terminal in the microcontroller (section 4)
- The motor makes a funny noise
- Make sure all four pins of the motor connector are firmly seated onto the microcontroller terminal
- Make sure the gear is not loose and slipping on the motor shaft (section 4)
+ The X axis rack moves once and then stops moving
- Make sure the X axis end switch is plugged into the correct terminal of the microcontroller
- Make sure the X axis limit switch is wired properly
+ The X axis rack moves with difficulty
- Make sure there's little friction between part F and the rail of part A (section 4)
- Add a lubricant to reduce friction (section 4)
- Make sure there are no plastic blobs on part F or in the rails of part A, or between the teeth of the X axis gear (section 4)
- Make sure the X axis gear doesn't exert too much downward pressure on the rack (section 4)
- Relieve this pressure by lifting up the X motor
- Make sure the backside of the X axis rack (part F) rests flat against part A if not part F will not slide properly (section 4)
- Make sure the X axis shim is not too thick (section 4)
- Make sure the gear is not loose and slipping on the motor shaft
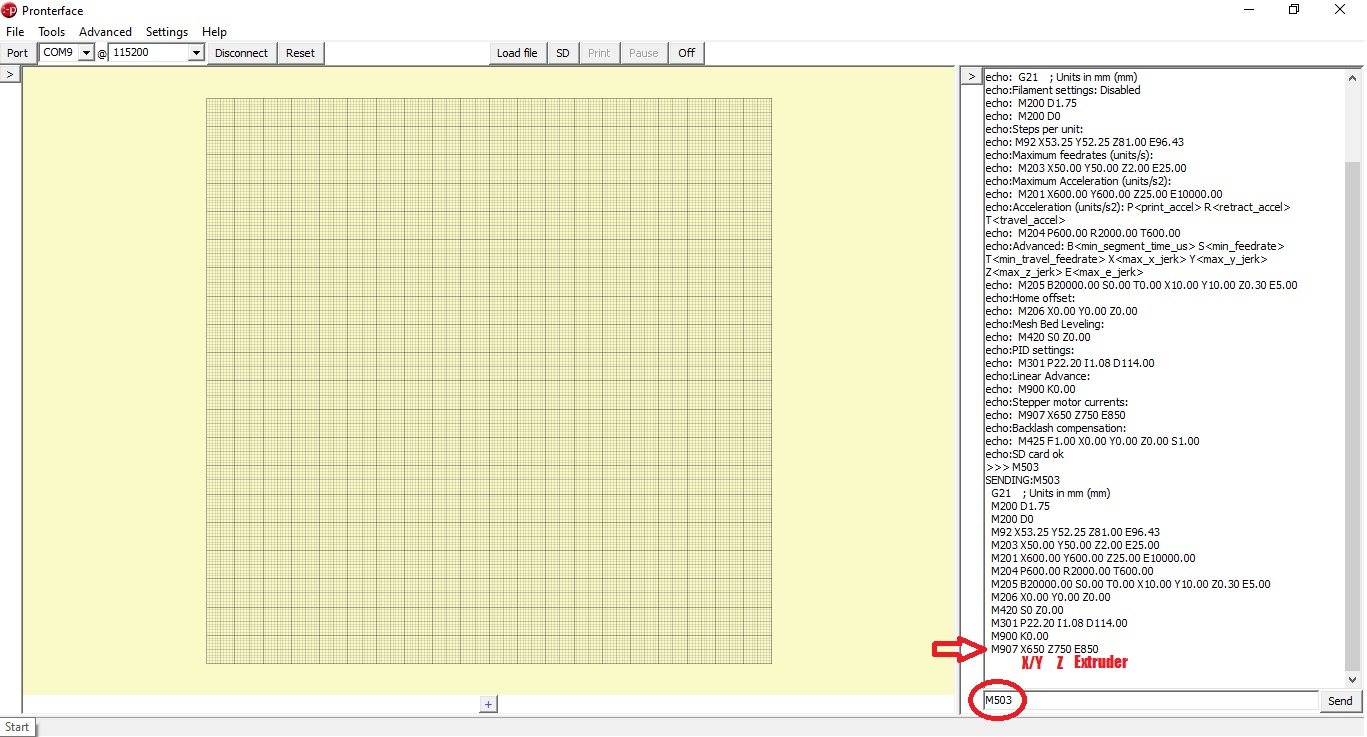
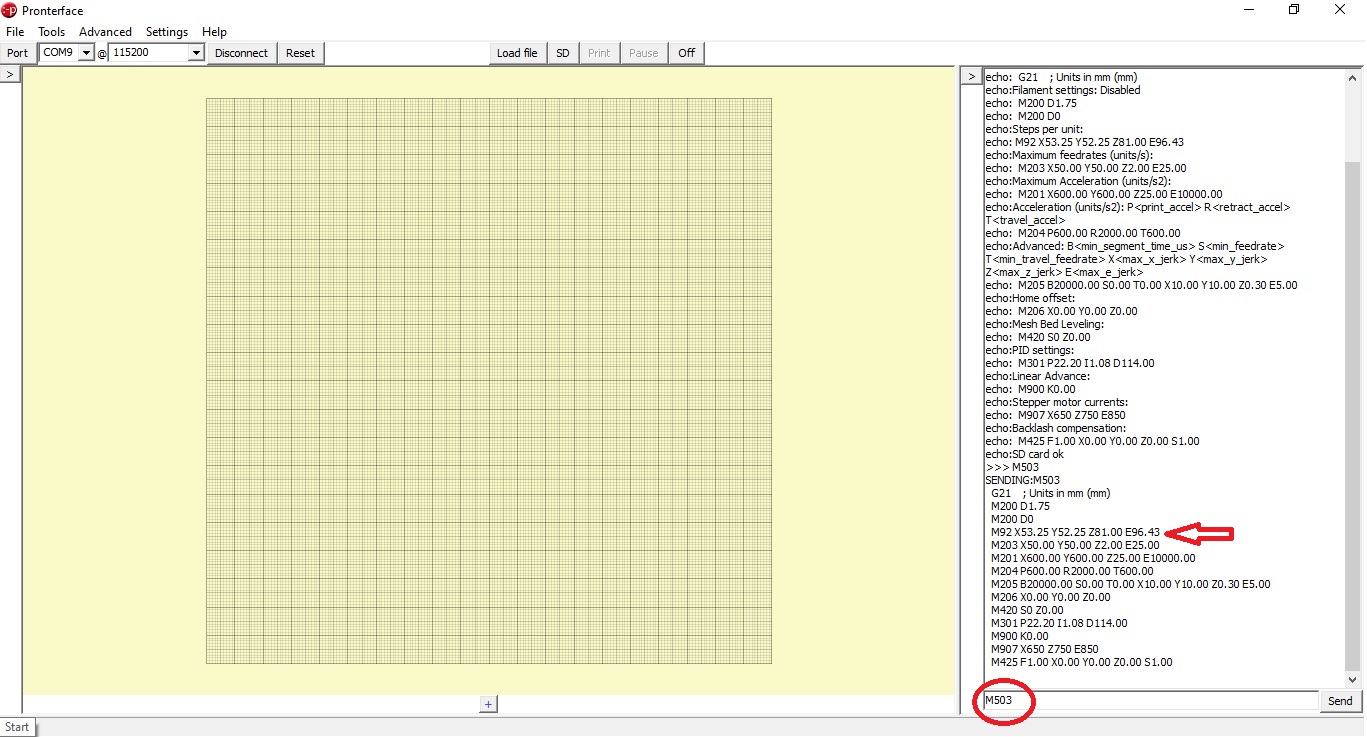
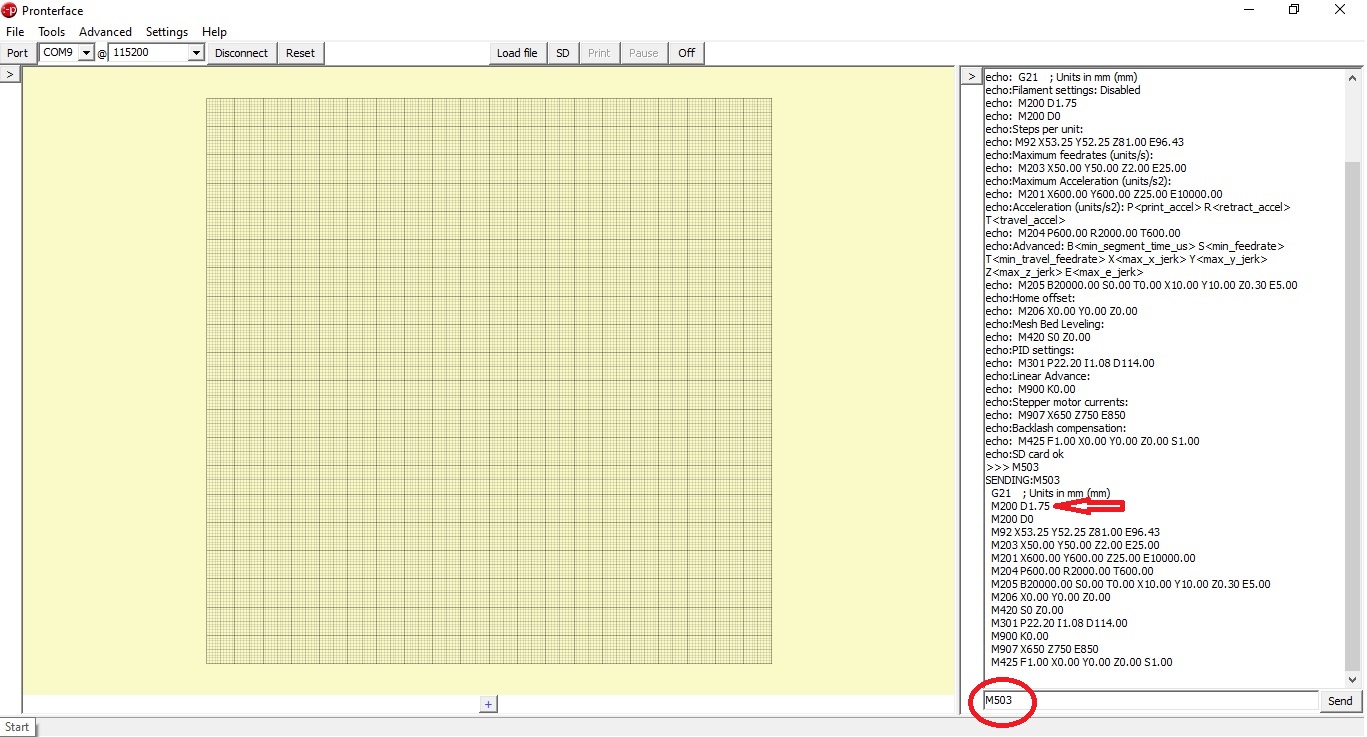
- Type M503 in Pronterface, the current to the motor of the X axis should indicate 650
- Otherwise, re-download Marlin
+ The X axis is not homing in the right direction
- Make sure to follow the proper color code when plugging the X motor connector to the microcontroller (section 4)
- Make sure to install the X axis rack with the teeth at the bottom
+ The X axis is homing in the right direction but it's not reaching the X endstop limit switch
- First DE-ENERGIZE the motors by clicking on the button motors OFF in Pronterface (or else the motors won't move manually)
- Try moving manually the X axis rack and see if it can reach the ends switch (you should hear a click) if not :
- Try unscrewing and readjusting the X rack top holder
- Make sure the wire of the hotend isn't blocking the X rack movement (section 4)
- Make sure the gear is not loose and slipping on the motor shaft
+ The X axis is reaching the X axis end switch but the rack is not stopping
- Make sure the X axis limit switch is plugged into the correct terminal of the microcontroller
- Make sure the X axis limit switch is wired properly
+ The X axis doesn't seem to be moving the correct distance
- Connect to Pronterface and type M503 in the command bar then click on send. The X axis steps/mm should indicate 53.25
- Otherwise, re-download Marlin
D
Y AXIS MOVEMENT
1 . Make sure you added lubrication
2 . Begin the startup (watch the video on the left)
+ The Y axis rack is not moving at all
- Make sure the Y motor connector is properly plugged onto the right terminal in the microcontroller (section 4)
- The motor makes a funny noise
- Make sure all four pins of the motor connector are firmly seated onto the microcontroller terminal
- Make sure the gear is not loose and slipping on the motor shaft
+ The Y axis rack moves once and then stops moving
- Make sure the Y axis end switch is plugged into the correct terminal of the microcontroller
- Make sure the Y axis limit switch is wired properly
+ The Y axis rack moves with difficulty
- Make sure there's little friction between part D and the rail of part C (section 4)
- Add a lubricant to reduce friction
- Make sure there are no plastic blobs on part D or in the rails of part C or between the teeth of the Y axis gear (section 4)
- Make sure the Y axis gear doesn't exert too much lateral pressure on the rack
- Relieve this pressure by pushing the Y motor against the rack (section 4)
- Make sure the Y lateral support (part J) is not too tight
- Try unscrewing and readjusting the Y rail
- Make sure the print bed lateral supports (parts P) are not too tight
- Try unscrewing and readjusting parts P (left and right)
- Make sure the gear is not loose and slipping on the motor shaft
- Type M503 in Pronterface, the current to the motor of the Y axis should indicate 650
- Otherwise, re-download Marlin
+ The Y axis is not homing in the right direction
- Make sure to follow the proper color code when plugging the Y motor connector to the microcontroller (section 4)
- Make sure the teeth of the Y axis rack point on the same direction as shown in the assembly video (section 4)
+ The Y axis is homing in the right direction but it's not reaching the Y endstop limit switch
- First DE-ENERGIZE the motors by clicking on the button motors OFF in Pronterface (or else the motors won't move manually)
- Try moving manually the Y axis rack and see if it can reach the endstop switch (you should hear a click) if not :
- Try unscrewing and readjusting the Y rail
- Try unscrewing and readjusting the print bed lateral supports (parts P)
- If the Y rack is not reaching at all the Y endstop you can add 1 x Phillips screw-3/8 in at the tip of the Y rack
- Make sure the gear is not loose and slipping on the motor shaft
+ The Y axis is reaching the Y endstop limit switch but the rack is not stopping
- Make sure the Y axis end switch is plugged into the correct terminal of the microcontroller
- Make sure the Y axis limit switch is wired properly
+ The Y axis gear seems to be skipping steps or just simply unable to move the Y axis rack
- Make sure there are no pieces of plastic in the racks, between the teeth of the gears and in the rails
- Make sure to minimize the gap between the teeth of the Y axis rack and the gear (but not too tight)(section 4)
- Make sure the Y lateral support (part J) is not too tight
- Try unscrewing and readjusting the Y rail
- Make sure the print bed lateral supports (parts P) are not too tight
- Try unscrewing and readjusting them
- Make sure the print bed lateral supports (parts P) are not too tight
- Try unscrewing and readjusting the Y rail
- Make sure the gear is not loose and slipping on the motor shaft
+ The Y axis doesn't seem to be moving the correct distance
- Connect to Pronterface and type M503 in the command bar then click on send. The Y axis steps/mm should indicate 52.25
- Otherwise, re-download Marlin
E
Z AXIS MOVEMENT
1 . Make sure you added lubrication
2 . Read the following instructions:
- First DE_ENERGIZE the motors by clicking on the button motors OFF in Pronterface (or else the motors won't move)
- Second, prepare the printbed (watch second video)
- Third, adjust manually the distance between the nozzle and the printbed (watch third video)
- Fourth, proceed with the Z axis startup (watch first video)
+ The Z axis rack is not moving at all
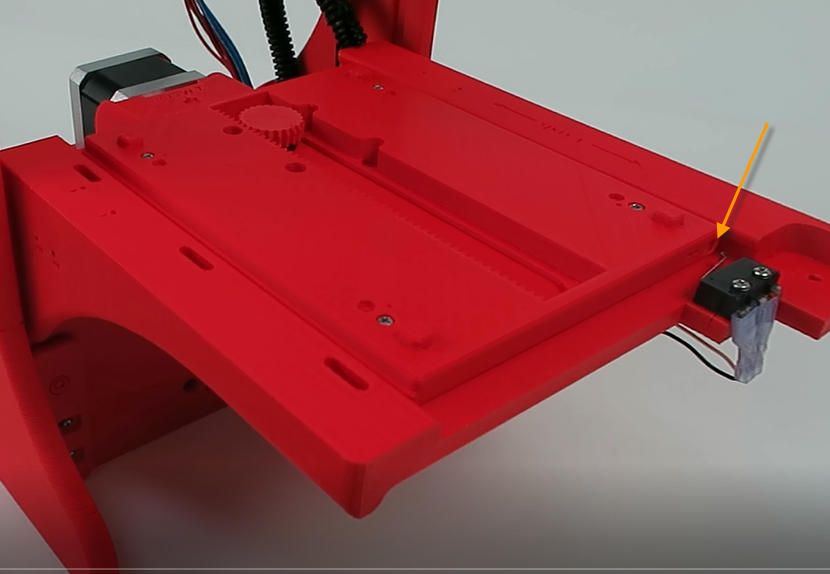
- Make sure the Z motor connector is plugged onto the right terminal in the microcontroller (section 4)
- The motor makes a funny noise
- Make sure all four pins of the motor connector are firmly seated onto the microcontroller terminal
- Make sure the gear is not loose and slipping on the motor shaft
+ The Z axis rack moves once and then stops moving
- Make sure the Z axis limit switch is plugged into the correct terminal of the microcontroller
- Make sure the Z axis limit switch is wired properly
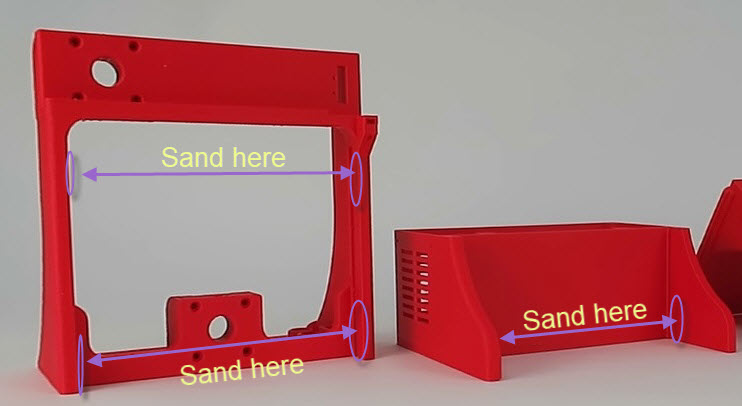
+ The Z axis rack moves with difficulty
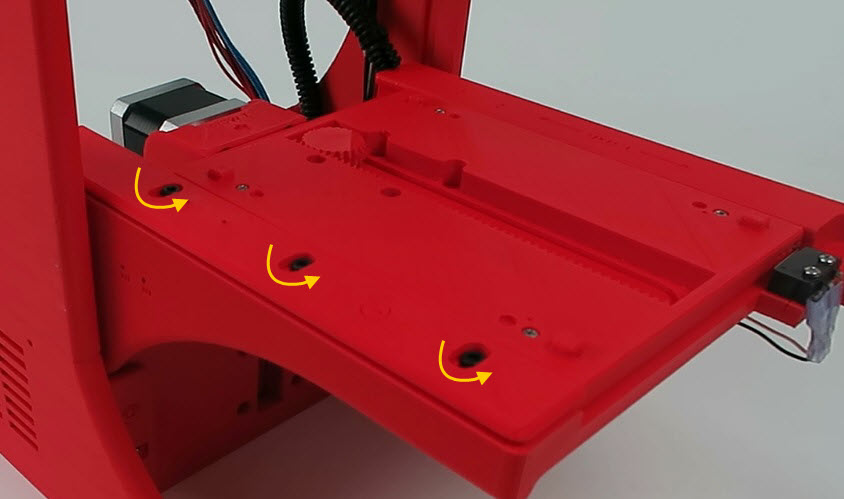
- Make sure there's little friction between part C and the rails of part A and B especially here
- Sand locally where there is friction on the sides of parts A and B (don't over sand)
Add a lubricant to reduce friction
Make sure there are no plastic blobs on part C or in the rails of part A and B, and between the teeth of the Z axis gear(section 4)
- Make sure the Z axis gear doesn't exert too much lateral pressure on the rack
- Relieve this pressure by pushing sideways the Z motor
- Try sanding slightly the left side of the Z lateral support-part Q
- Sand lightly the bakcside of the Z siderail support
- Sand lightly the shim on the backside of part C
- Make sure the gear is not loose and slipping on the motor shaft
- Type M503 in Pronterface, the current to the motor of the Z axis should indicate 750
- Otherwise, re-download Marlin
+ The Z axis is not homing in the right direction
- Make sure to follow the proper color code when plugging the Z motor connector to the microcontroller (section 4)
+ The Z axis is homing in the right direction but it's not reaching the Z endstop limit switch
- First de-energize the motors by clicking on the button motors OFF in Pronterface (or else the motors won't move manually)
- Try moving manually the Z axis rack and see if it can reach the endstop switch (you should hear a click) if not:
- Try sanding slightly the left side of the Z lateral support-part Q
- Sand lightly the shim on the backside of part C
- Sand lightly the backside of the Z siderail support
- Sand locally where there's friction on the sides of parts A & B
- Don't over sand
- You might need to relief the pressure between the Z axis rack and pinion (not too much or else the teeth will skip)
- Make sure there are no pieces of plastic in the racks, between the teeth of the gears and in the rails
- Make sure the gear is not loose and slipping on the motor shaft
+ The Z axis is reaching the Z endstop limit switch but the rack is not stopping
- Make sure the Z axis limit switch is plugged into the correct terminal of the microcontroller
- Make sure the Z axis limit switch is wired properly
+ The Z axis gear seems to be skipping steps or simply unable to lift the print platform (part C)
- Make sure there are no pieces of plastic in the racks, between the teeth of the gears and in the rails
- Try sanding slightly the left side of the Z lateral support-part Q
- Sand lightly the shim on the backside of part C
- Sand lightly the bakcside of the Z siderail support
- Sand locally where there's friction on the sides of parts A and B
- Don't over sand
- Make sure to minimize the gap between the teeth of the Z axis rack and the gear (but not too tight)(section 4)
- Make sure the gear is not loose and slipping on the motor shaft
+ The Z axis doesn't seem to be moving the correct distance
- Connect to Pronterface and type M503 in the command bar then click on send. The Z axis steps/mm should indicate 81.00
- Otherwise, re-download Marlin
F
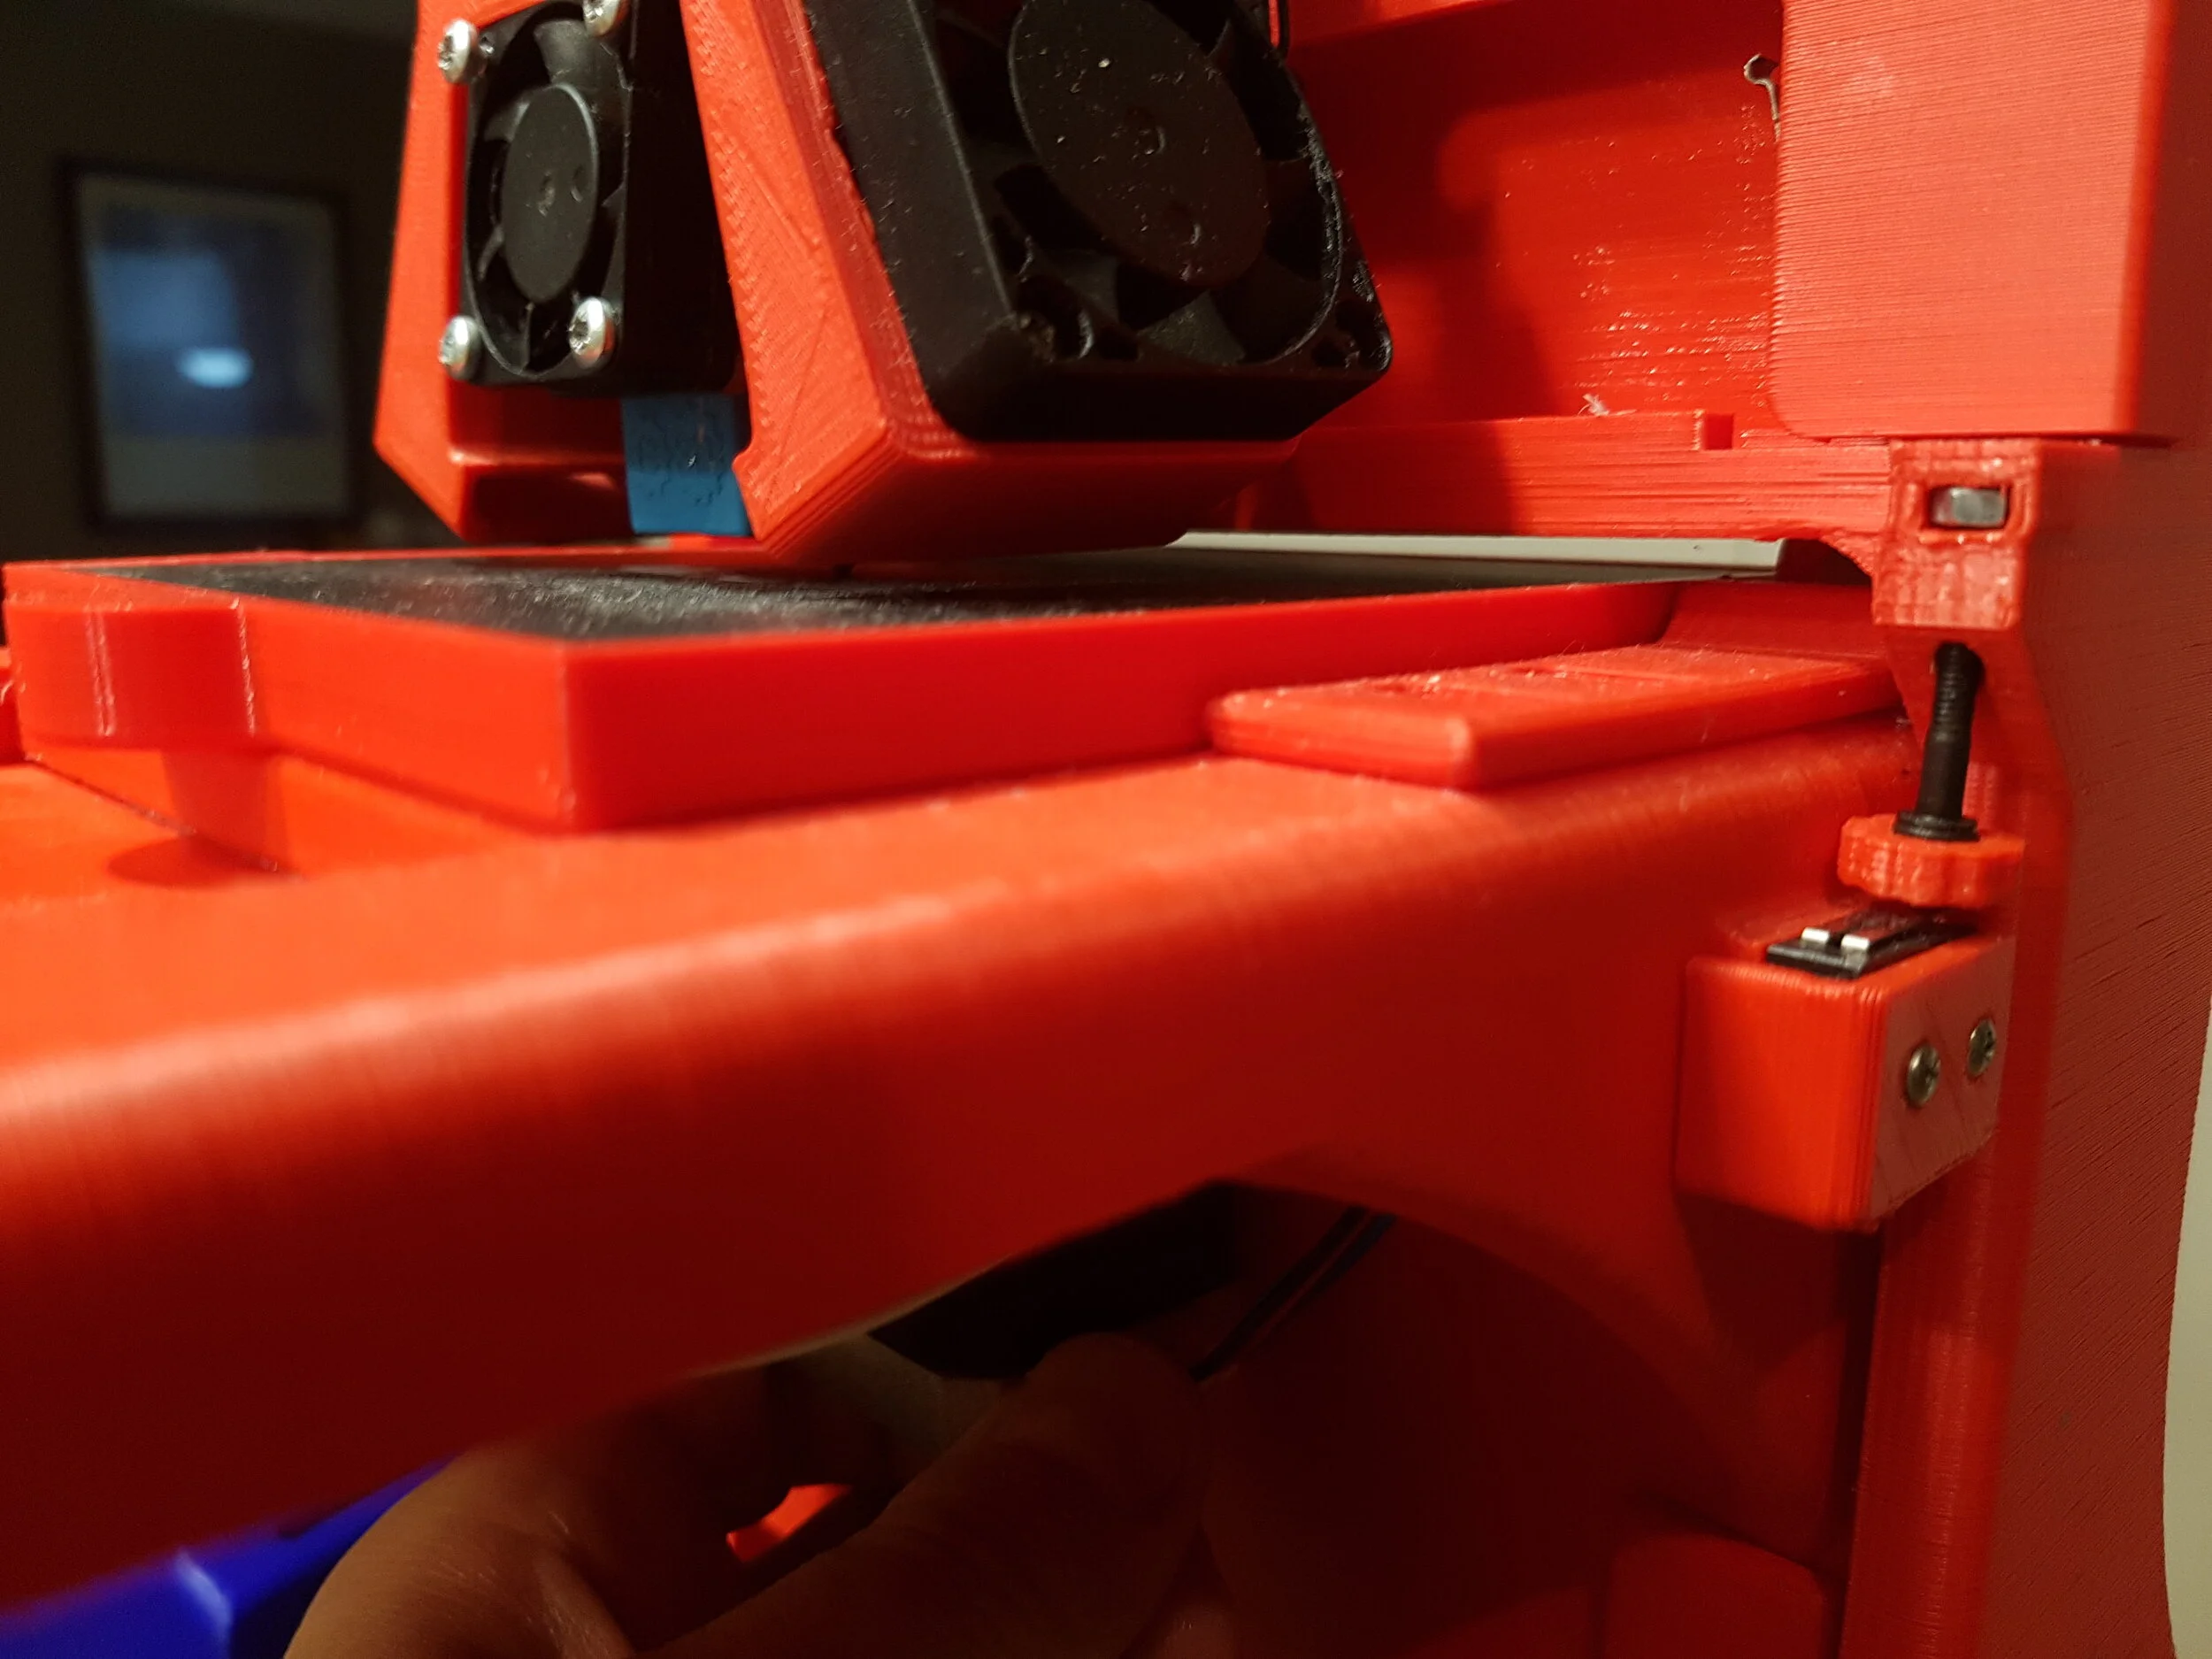
HOTEND and COOLING FAN2

1 . Begin the startup (watch the video on the left)
- Please note there's a thermal protection that limits the hotend from heating above 225 deg C
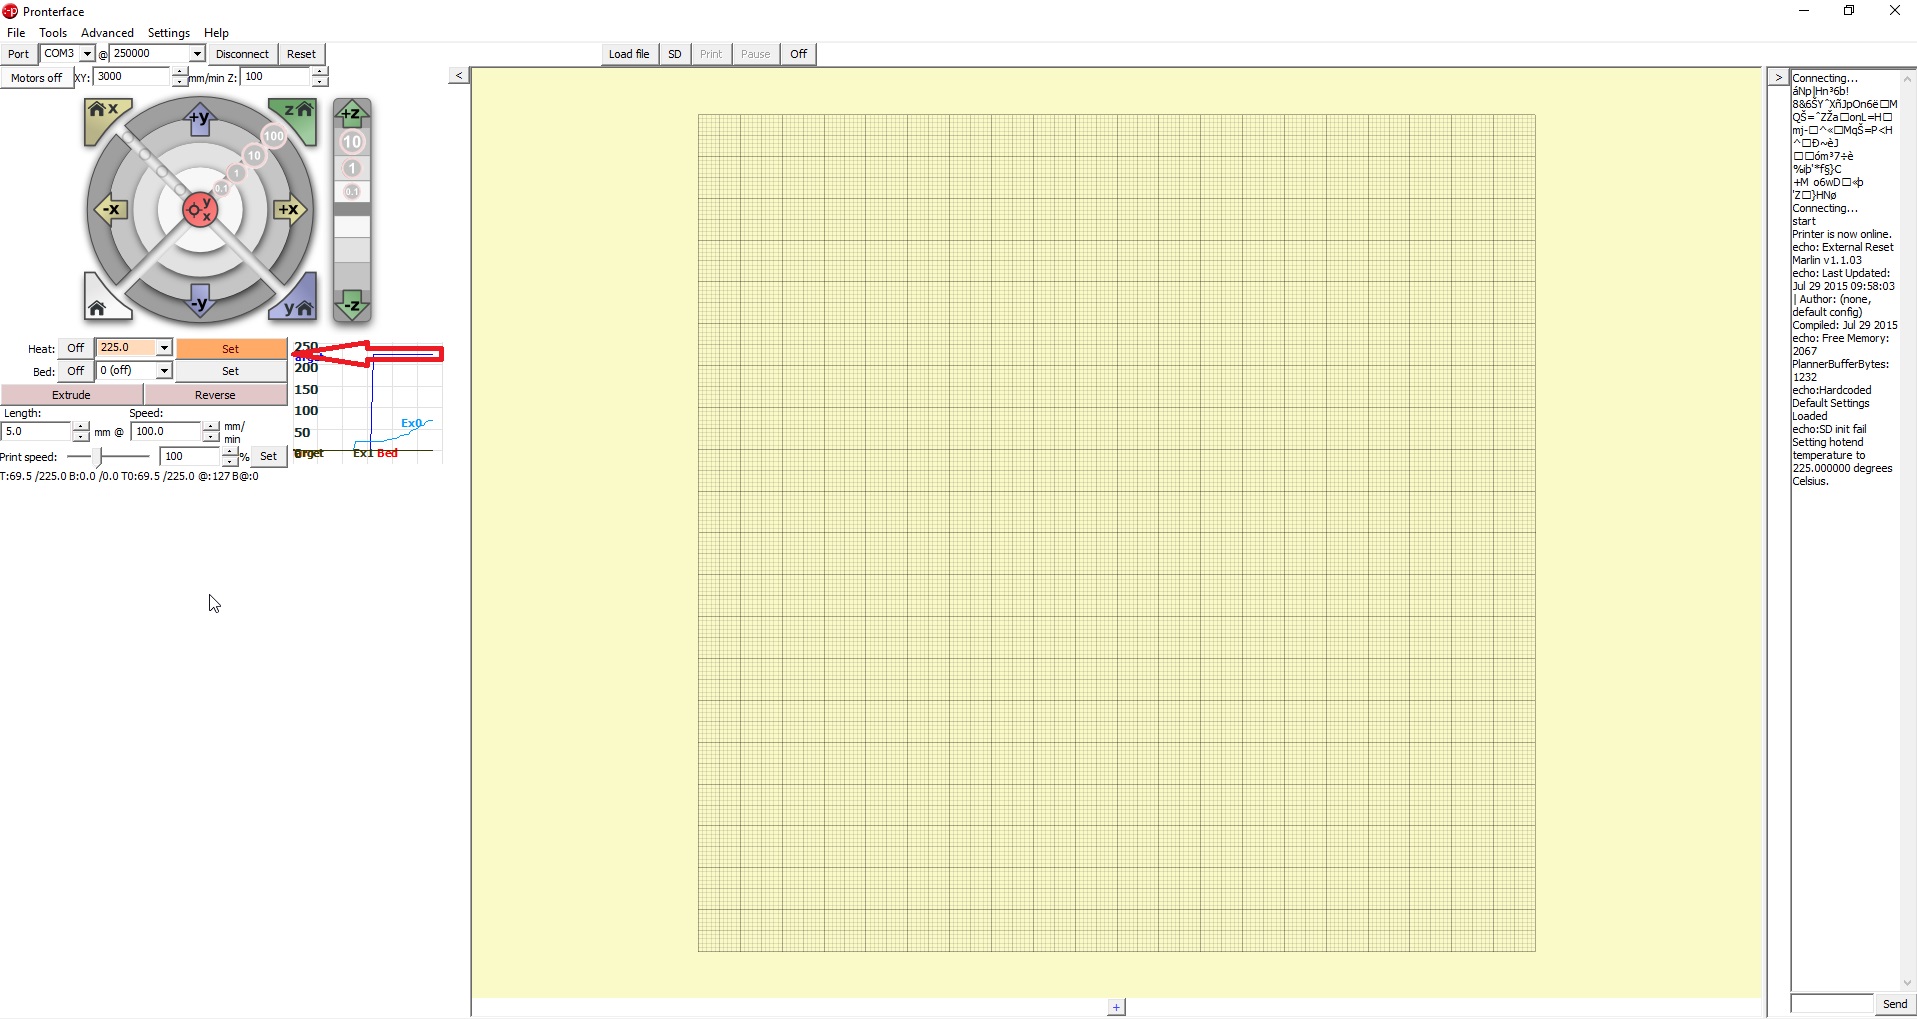
+ I can't read the temperature with Pronterface
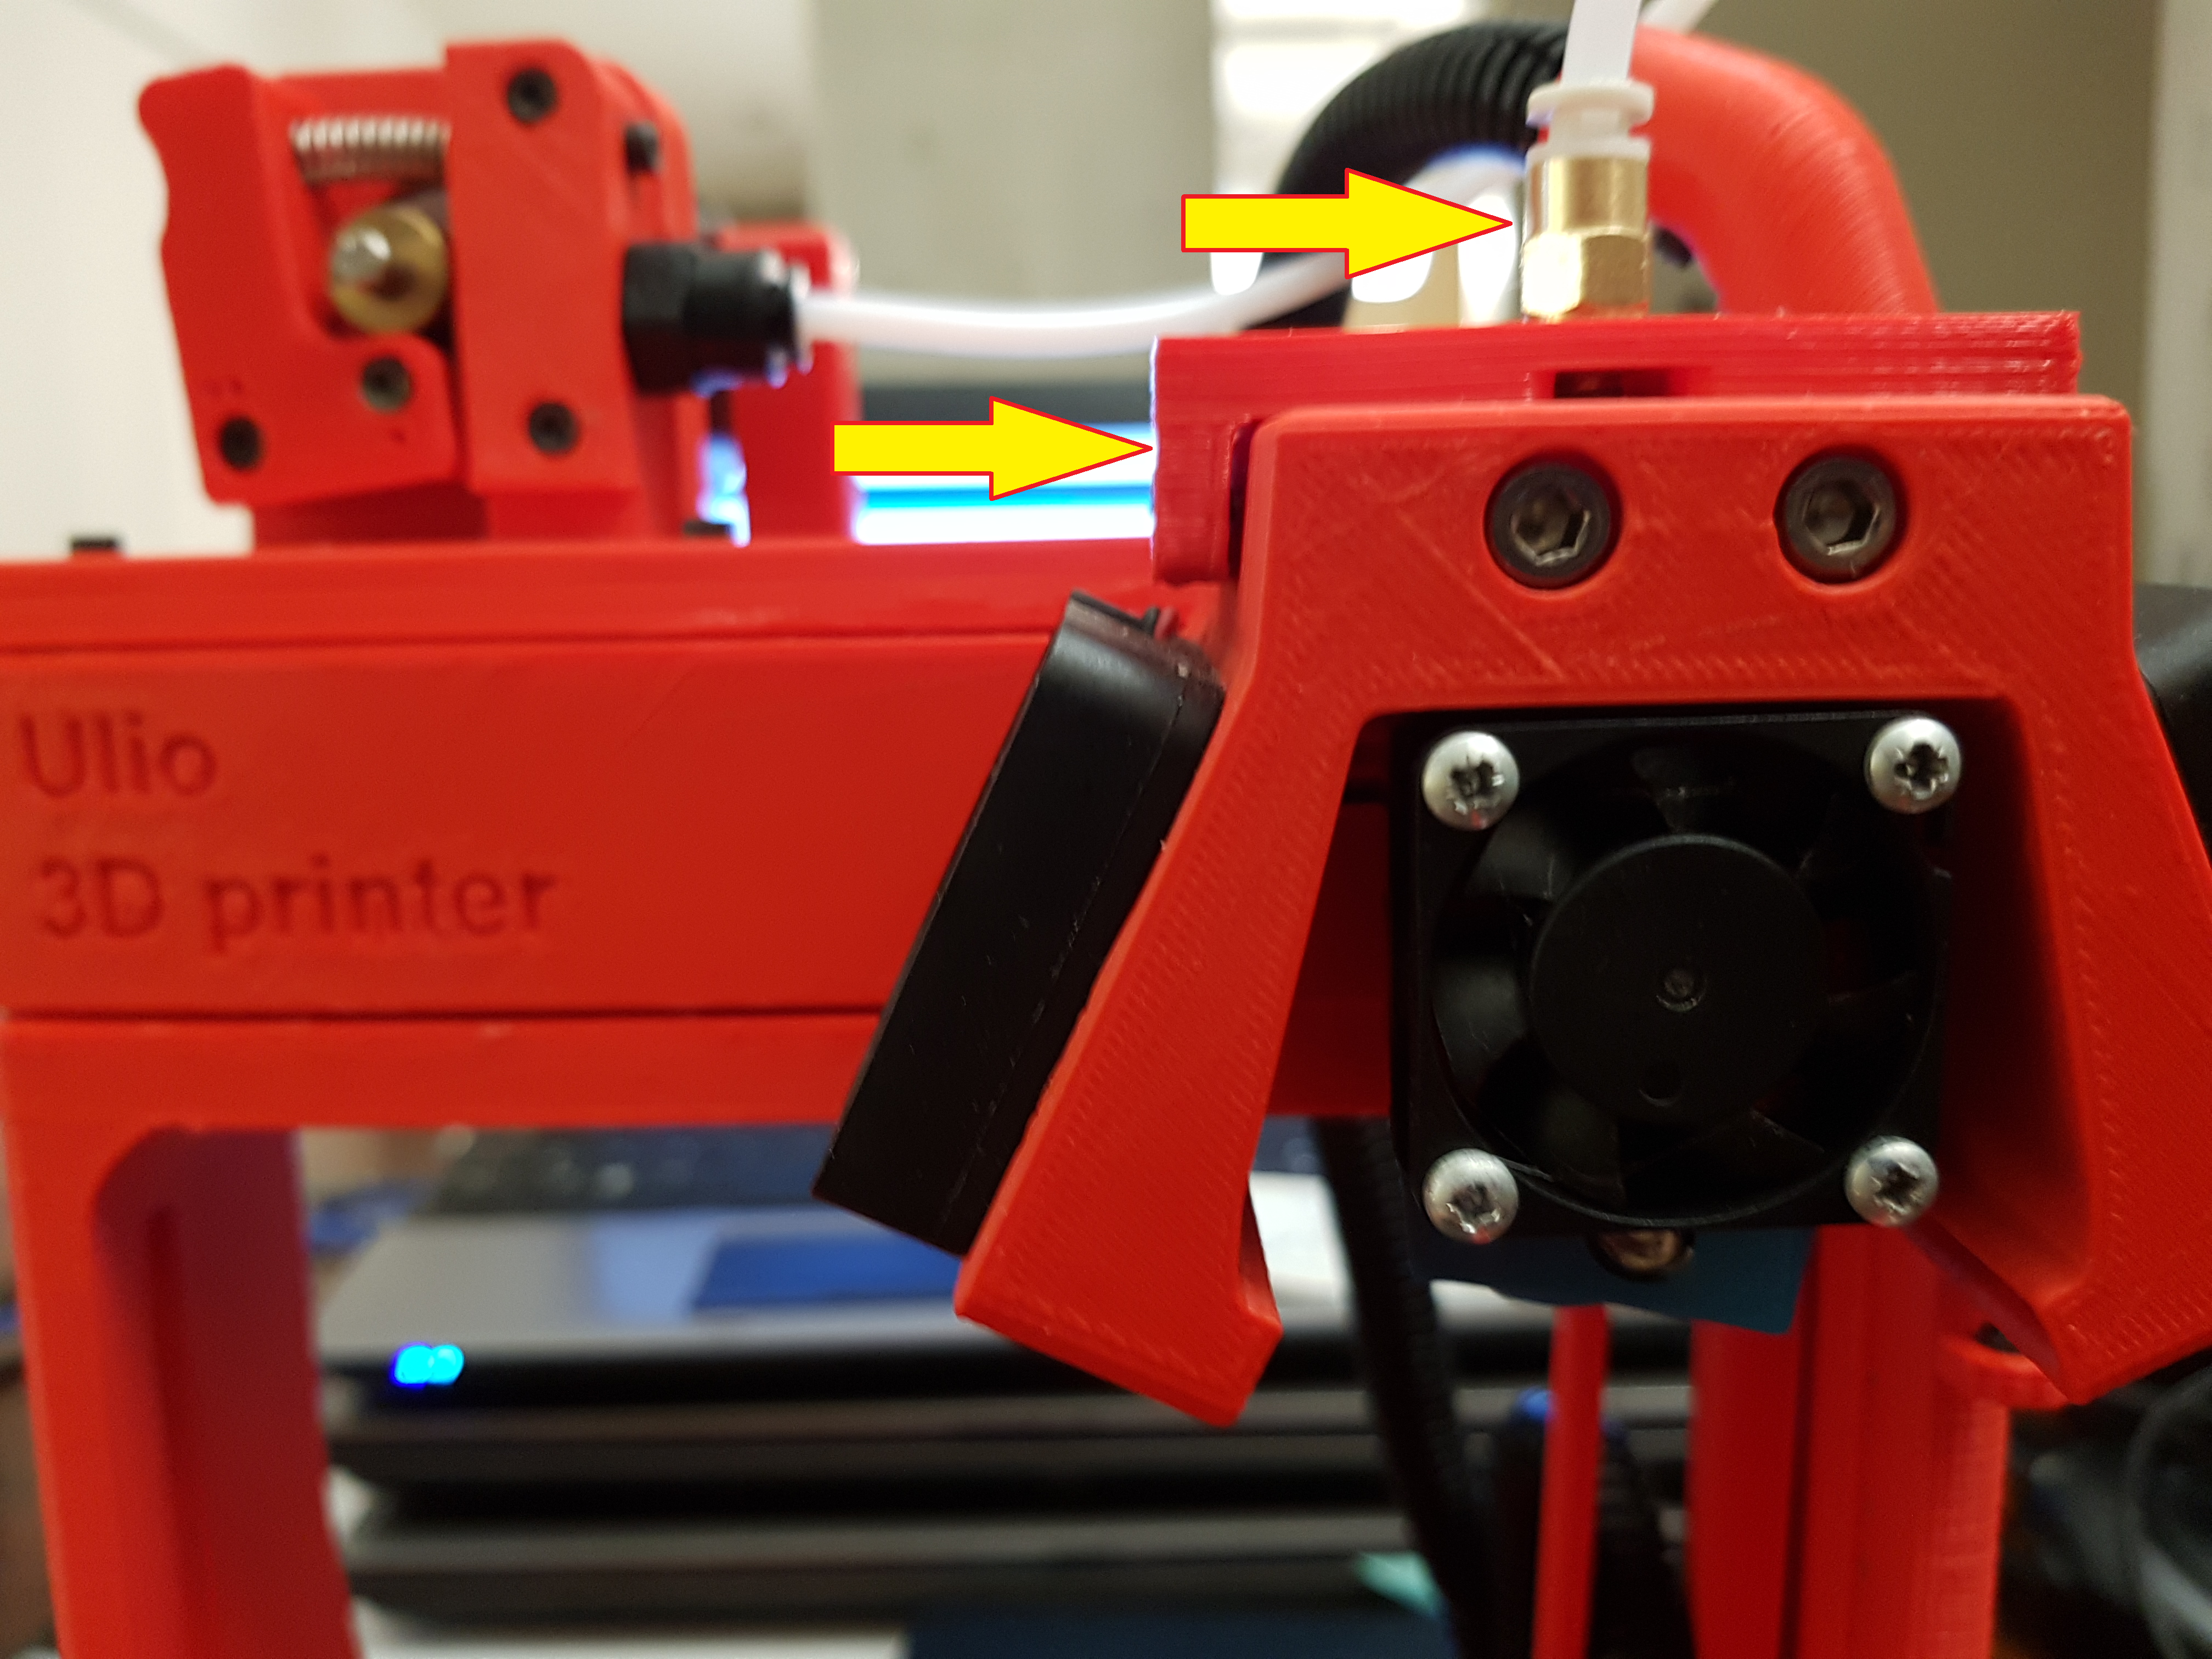
- Make sure the thermistor is plugged properly into the microcontroller (section 4)
- Make sure you didn't connect the thermistor to the FAN2 extension cable
- Make sure you have good contact between the thermistor's connector and the connector of the extension cable (simply pinch both connectors)
- Make sure the thermistor is not damaged
- Measure the thermistor's electrical resistance with a multimeter, you should read something close to 100K
- If you read a value of 1, your circuit is open or your thermistor is damaged
- Measure the thermistor's electrical resistance with a multimeter, you should read something close to 100K
+ The heater bloc is getting hot but the temperature is not rising and the hotend cooling Fan2 is not working
- Make sure you didn't plug the thermistor to the FAN2 extension cable and the FAN2 connector to the thermistor extension cable
- The thermistor and FAN2 extension cables are identical, make sure they are properly connected on both ends (section 4)
+ The hotend cooling fan (FAN2) is not starting automatically when the hotend temperature reaches 50 deg C
Make sure you've properly connected the fan (FAN2) to the microcontroller(section 4)
- Don't forget FAN 2 is polarized meaning you can not reverse the wires (make sure the red wire is on the side of the USB connection)
- FAN2 connector does not have any locking mechanism, just make sure it did not get unplugged during the assembly in section OO
- Make sure you have good contact between the FAN2 connector and the connector of the extension cable (simply pinch both connectors)
- Although it's highly unlikely but maybe the FAN2 has been damaged
- Connect the fan directly to the 12 VDC of the power supply to confirm if it's damaged (respect the polarity of the fan)
G
EXTRUDER movement
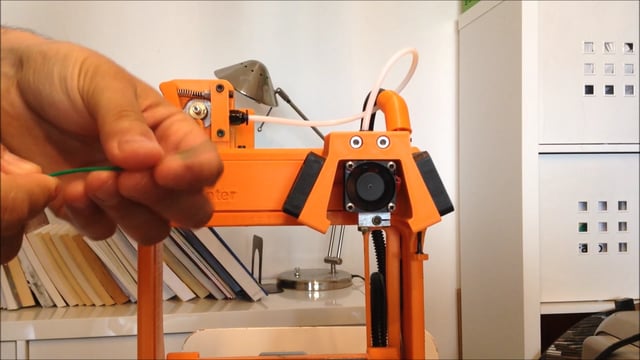
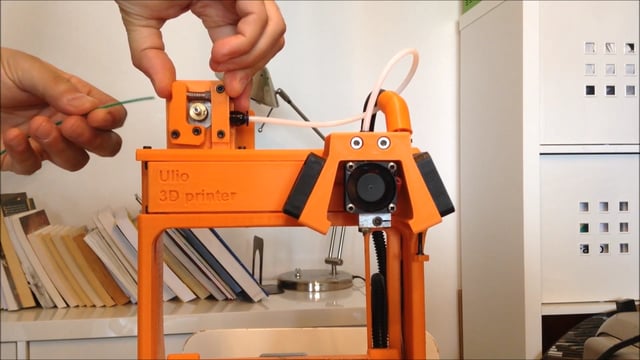
1 . Make sure to load a PLA filament into the printer before moving ahead with the extruder startup
- First heat up the hotend to 225 deg C
- Straighten about 2 in of filament (watch the video)
- SHARPEN THE TIP of the filament
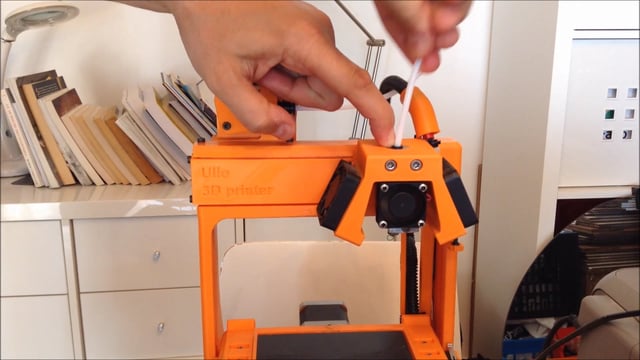
- Squeeze the handle of the extruder and Insert the filament into the bowden tube all the way untill it reaches the hotend (watch the video)
- Now you're ready to test the extruder
2 . Begin the startup (watch the video on the left)
+ The extruder is not turning at all or is turning with difficulty
- Is the extruder's motor connector plugged onto the right terminal in the microcontroller? (section 4)
- The extruder motor makes a funny noise
- Make sure all four pins of the motor connector are firmly seated onto the microcontroller terminal
- Type M503 in Pronterface, the current of the extruder's motor should indicate 850
- Otherwise you will have to re-download Marlin
+ The extruder is not turning counter clockwise
- Follow the proper color code when plugging the extruder motor connector to the micro controller(section 4)
+ The extruder's motor shaft is turning but not the hobbed gear
- Tighten the set screw on the flat side of the motor shaft
If you have extrusion problems please refer to section I
H
SIDE COOLING FANs 1

1 . Begin the startup (watch the video on the left)
- Although not shown clearly in the video you have to send a Gcode command to start the side cooling fans (FAN1)
- Write M106S255 in the command bar of Pronterface and click on send
- Write M107 (or M106S0) in the command bar to stop the side cooling fans (FAN1)
+ The side cooling fans (FAN1) didn't start
- Make sure they were properly connected to the micro controller
- FAN1 is polarized meaning you can not reverse the wires (section 4)
- Make sure FAN1 didn't get unplugged from the microcontroller
- Although it's highly unlikely but maybe the side cooling fans FAN1 have been damaged
- Connect the fan directly to the 12 VDC of the power supply to confirm if it's damaged (respect the polarity of the fan)
I
EXTRUSION PROBLEMS
Download and print this Gcode file of a 10 mm calibration cube. If you're experiencing under extrusion or a clogged hotend, simply follow our troubleshooting steps:
But first if you still have the typical hotend assembly, we highly recommend to print and install the new setup
- STL file: section G in the STL download page
- Assembly: Section V in the video assembly page
+ Alot of issues can cause extrusion problems, check out these easy fixes first
- Don't print in a cold room & avoid direct draft on the printer
- Did you downloaded ULIO's Marlin firmware? (section 5)
- Is your extruder's motor working properly? (step G)
- Did you select ULIO as your 3D printer in Cura? (section 8)
- Did you adjust ULIO's machine settings in Cura?(section 8)
- Did you import ULIO's print parameters into Cura?(sect. 8)
- Don't underscale your 3D model. Don't print any object with a wall thickness less then 0.8 mm
- Are you using Babystep Z for your first layer? (section 8)
- Type M503 in Pronterface, is the extruder's step/mm 96.43
- If not, re-download Marlin
- Type M503 in Pronterface is the Z axis step/mm 81.00
- If not, re-download Marlin
- Type M503 in Pronterface, is the extruder's current 850
- If not, re-download Marlin
- Is the filament diameter 1.75 mm in CURA and Pronterface
- Did you install the silicone cover on the heater block?
- Is the print temperature relatively unstable?
- Scroll to "the hotend temperature is varying a lot"
- Is the filament spool rolling freely and is not tangled?
- Is the filament sliding freely inside the PTFE tubing?
- Is the filament broken inside the PTFE tube?
- Are you printing with a fairly new, good quality PLA that has not absorbed moisture
- Did you tighten the set screw of the extruder? (section 4))
- Is the filament slipping on the hobbed gear?
- Are your extruder's openings properly aligned? (section 4)
- Is the filament pinched between the hobbed gear and the ball bearing?
- Did you install the washers on each side of the ball bearing and is it rolling freely?
- If you have the typical PTFE hotend installation (option2), make sure you've installed the blue retaining clip(section 4)
- Did you properly tighten the nozzle to the heater block?(section 4)
- Reprint and install the latest STL file of part M (section3)
- Adjust the extrusion rate to 120% in Cura and do a test print, if that solves your problem then:
- Is your filament's diameter 1.75 mm?
- You might have a partially clogged hotend
+ Verify if the hotend is clogged
- Set the hotend temperature to 225 °C
- Squeeze the extruder handle (part M) and push manually the filament out of the hotend
(you have to force a little)
- If the filament curls out or does not come out perfectly straight out of the nozzle then your hotend is partially clogged
- If nothing comes out then your hotend is completely clogged
First step:
Remove the filament from the printer
- Squeeze the extruder handle (part M), push the filament manually torwards the hotend, then pull it back out completely
Second step:
Use an acupuncture needle to unclog the 0.4 mm bore of the nozzle
- Keep inserting and removing the needle until the filament comes out fairly straight from the nozzle with no curling (needle not included in our kit)
- Do a test print and if you're still having extrusion problems then head to the third step
Third step:
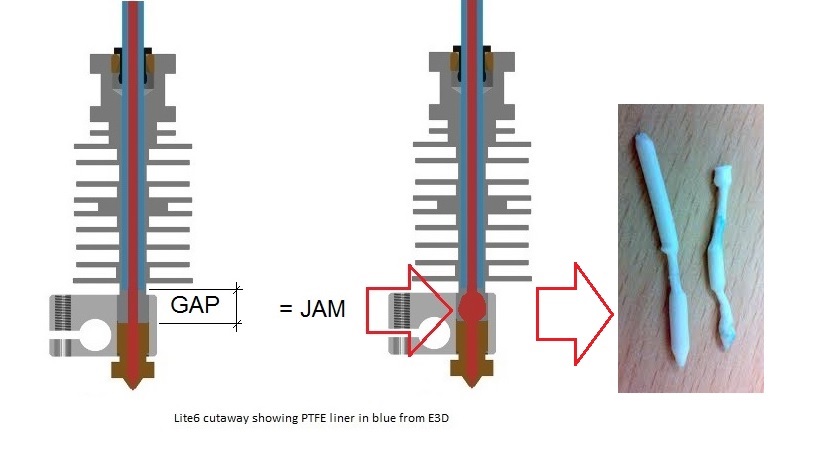
Verify the tip of the bowden tube is not jammed with a PLA residue
- Usually this happens if there's a gap between the end of the bowden tube and the nozzle meaning:
- The bowden tube wasn't inserted properly all the way down the hotend
- during retraction the bowden tube might've lifted up
- The nozzle wasn't tightened properly to the heater block
- Verify if the end of the PTFE tube is flat(section 4)
- Remove all components to access the black locking clip of the hotend
- Press down the black locking clip and slowly remove the bowden tube from the hotend
- Clean the end of the bowden tube from any PLA residue
- Reinsert and remove the bowden tube as many times as necessary until there's no more PLA residue at the tip of the bowden tube
- Watch the video in the gallery
- Once then end of the bowden tube is completely clean reassemble the hotend (section 4)
Final step:
If your hotend is still completely clogged
- Purchase a new 0.4 mm nozzle
- Set the hotend temperature to 225 °C
- Remove the old nozzle
- Install the new nozzle(section 4)
- For additional information about clogged hotends check out this video by Thomas Sanladerer: https://www.youtube.com/watch?v=g8uvh6kvr54
+ The extruder is making a clicking sound
- Your hotend might be clogged
- The tip of the nozzle is too close to the print bed
+ The hotend temperature is varying a lot and i'm getting cold extrusion or thermal runaway error messages
Sometimes if your room is cold (air conditioned or unheated) or there's a direct draft on the printer you might experience some printing issues that have nothing to do with the printer but rather to the surrounding environment
The cold room might cause your hotend temperature to fluctuate by as much as 10 deg C and even higher
- This will leave ugly lines on the print
- The extruder might start clicking
- The printer might even stop working if the hotend temperature drops below 180 deg C and you'll get cold extrusion or even thermal runaway error messages
If you can't print in a different room then:
- Make sure you have installed the blue silicone sock on the heater block
- reduce the fan speed FAN1 in CURA and see if the temperature settles down
- If reducing the fan speed doesn't work then try to raise the printing temperature by 5 or 10 deg C
- You can also try to autotune the temperature PID loop
- Please watch this video by Thomas Sanladerer
+ I'm experiencing some delamination issues
If the room is too cold you might also experience some delamination of the layers
- The temperature of the hotend is hot enough to extrude the filament but the room temperature is too cold for the extruded filament to stick properly to the previous layer
- If you can't print in another room, you can increase the hotend temperature by 5 or 10 deg C
J
End of the startup

If the printer starts acting funny you can reset the printer through Pronterface or simply reinstall the Marlin firmware (section 5)
Before disconnecting from Pronterface make sure to TURN OFF the heating element of the hotend by clicking on heater OFF
If you simply disconnect the printer your heating element keeps heating!!!
Once you turned off the heater you can disconnect and shut off the printer